Writing a strong thesis or dissertation often requires interviews as part of your research methodology. To analyze this qualitative data properly, transcribing interviews is an essential step. This not only makes your material easier to review but also ensures that your findings are reliable and transparent. In this guide, you’ll learn how to do interview transcription effectively and integrate them into your academic work.
Definition: Transcribing interviews
Transcribing interviews means turning a spoken conversation (from audio or video) into written text. In academic research, this is an integral part of your methodology.
Why does it matter?
- Makes it easier to analyze and code.
- Creates a permanent record of your transcription files.
- Ensures transparency and reliability in academic writing.
- Links your interview answer directly to your research question.
Methods of transcriptions
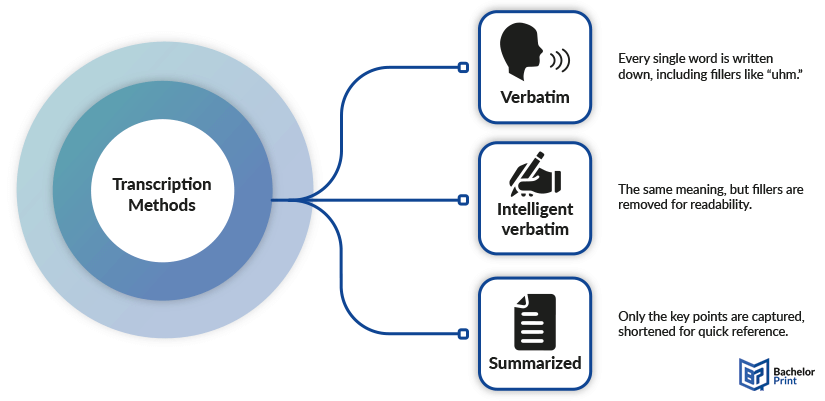
- Verbatim ➜ Every word, including pauses and fillers
- Intelligent verbatim ➜ Words only, fillers cleaned up
- Summarized ➜ Main ideas, shortened for quick reference
Note: Choose the method that fits your research questions and thesis requirements.
Methods
There isn’t just one way to write down interviews. The method you select depends on your research questions, your methodology, and the level of detail your thesis requires. This choice directly shapes how you’ll work with your qualitative research later.
The three main methods
- Verbatim transcription ➜ Every single word, including fillers like “uhm” or “you know.”
- Intelligent verbatim ➜ Same meaning, but without the fillers or repeated words.
- Summarized transcription ➜ Only the key points, shortened for quick reference.
Comparison table
Method
Use
Pros
Cons
Verbatim
When exact wording, pauses, and tone matter.
Intelligent verbatim
When you need clear, readable transcripts for academic work.
Summarized
When only themes or main ideas are needed.
Note: If your supervisor doesn’t specify, intelligent verbatim is usually the safest choice.
To make these three methods easier to understand, here’s a short example of the same interview excerpt written out in verbatim, intelligent verbatim, and summarized form. This comparison shows how much detail you keep or lose depending on the method you choose.
Examples

Manual vs. automatic vs. professional
When it comes to transcribing interviews, you have three main options. Each has different time requirements, costs, and accuracy levels.
Typing the transcript yourself without the help of AI or professional transcription services.
Best for:
- Short or critical interviews
- Sensitive data where privacy is essential
- Researchers who want to engage deeply with their material
Time commitment:
- 4 hours per 1 hour of audio recordings (not including editing)
Pros:
✅ Full control over detail and formatting
✅ Handles poor audio, background noise, and accents better
✅ Highest accuracy because humans catch nuance better than AI
Cons:
❌ Extremely time-consuming
❌ Can be tiring and prone to human error over long sessions
Automatic transcription tools use speech recognition to quickly analyze audio and create
a draft transcript.
Best for:
- Fast, low-cost drafts
- Large amounts of audio
- Clear, single-speaker recordings
Examples:
Pros:
✅ Very fast
✅ Much cheaper than professional services
Cons:
❌ Always needs manual review and corrections
❌ Lower accuracy with noise, accents, or jargon
Trained human transcribers produce your interview transcription, often supported by
secure platforms.
Best for:
- Handles multiple speakers and complex audio
- High-stakes projects (academic theses, legal, medical)
- When near-perfect accuracy and confidentiality are required
Examples:
Pros:
✅ Excellent accuracy and quality
✅ High security and confidentiality
Cons:
❌ Most expensive option
❌ Slower turnaround (hours to days)
Other software
Note: These aren’t always free, but they can be handy if your thesis requires lots of interview data.
Do you even need transcription software?
Not always! Some free tools you already use can do the job:
- Video editing apps ➜ VEED, Clideo, and similar editors often include automatic transcription.
- Screen recording tools ➜ Loom and Vidyard can auto-caption or transcribe your videos directly, sometimes on a free plan.
- Video conferencing apps ➜ Zoom, Google Meet, and Microsoft Teams now have built-in transcription and AI meeting features.
Note: These are great for quick notes or drafts, but if you need a clean, reliable transcript, always review and edit carefully.
Step-by-step
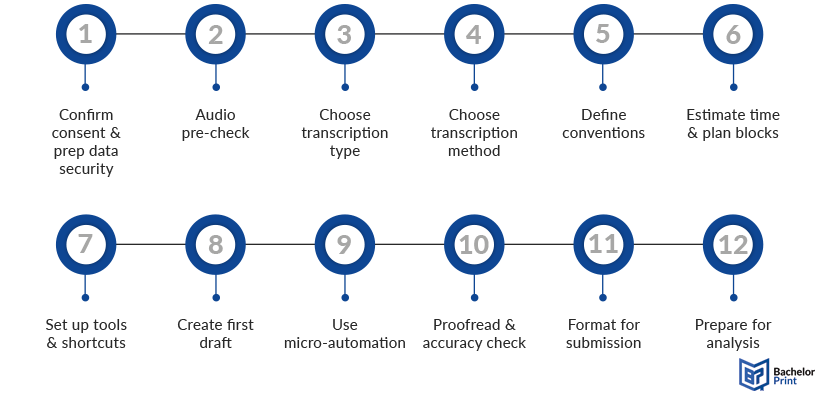
Follow these steps to create a reliable interview transcription for your thesis or dissertation.

1. Confirm consent & prep data security
- Always get recorded consent before starting.
- Anonymize names with codes like [INT], [P1], and [P2].
- Store audio files in encrypted folders.
- Create a second, anonymized version for your appendix.
Note: Never store sensitive data on a shared device or in a public cloud.
2. Audio pre-check
- Note length, number of speakers, and background noise.
- Identify accents or technical terminology.
- Decide if you need audio clean-up (e.g., noise reduction).
3. Choose transcription type
- Manual ➜ Precise but time-intensive.
- Automatic ➜ Fast, cheap, requires correction.
- Professional ➜ Expensive but very accurate.
Match this to your budget, deadline, and accuracy needs.
4. Choose transcription method
- Verbatim ➜ Every word, fillers included.
- Intelligent verbatim ➜ Meaning intact, fillers removed.
- Summarized ➜ Only key points.
Note: Intelligent verbatim is used for most theses unless your methodology requires full verbatim.
5. Define conventions
- Speakers: [INT] for interviewers, [P1] for participants
- Timestamps: Every 30–60 s or at each speaker change
- Non-verbal: [pause 2s], [laughter], [overlap]
- Unclear audio: [inaudible 00:14:32]
Consistency is more important than exact rules!
6. Estimate time & plan blocks
- Manual transcription = ~4 hours per 1 hour of audio
- Automatic transcription = ~1–2 hours, including corrections
- Break work into 25–50 min sessions to avoid fatigue
7. Set up tools & shortcuts
- Adjust playback speed and hotkeys
- Use text expanders for recurring tags:
- ;um ➜ [inaudible __:__:__]
- ;p ➜ [pause Xs]
- ;ov ➜ [overlap]
- ;la ➜ [laughter]
- Optional: Transcription foot pedal, quality headphones
8. Create a first draft
- With AI: Generate an AI-powered transcription, then start corrections
- Manually: Type straight through, minimal formatting at first
9. Use micro-automation
- Auto-capitalization for speaker labels
- Set up autocorrect (e.g., thnak ➜ thank)
- Keep a glossary for technical terms or acronyms
10. Proofread & accuracy check
- Pass 1: Fix spelling, labels, and timestamps
- Pass 2: Spot-check 5–10 minutes across the file
- Aim for 95–98% accuracy on quotes you’ll use in your thesis
11. Format for submission
- One paragraph per speaker turn
- Add headers, page numbers, and titles
- Use a clear font and consistent line spacing
- Name transcription files consistently (e.g., INT01_P1_Verbatim_v2.docx)
Note: Always check your university’s formatting rules!
12. Prepare for analysis
- Add margin notes or memos
- Highlight answers connected to research questions
- Keep both the original audio recordings and the final transcript backed up
- Export to your tool of choice (NVivo, ATLAS.ti, MAXQDA, Excel)
Note: Save working copies with version numbers to avoid confusion later.
Time budgeting guide
Method
Time (per 1h audio)
Manual (beginner)
6–8 hours
Manual (intermediate)
3–5 hours
AI + human correction
1.5–3 hours
Professional service (QC only)
0.5–1 hour
Note: Add extra time for noisy audio, multiple speakers, or heavy jargon.
Best practices & tips
Transcribing interviews can be a demanding part of qualitative research, but a few smart strategies will save you hours and improve accuracy:
✅ Use transcription software
AI-based transcription tools can create a first draft. However, you should always review the output carefully, especially if you plan to quote it in your thesis or dissertation.
✅ Work in a quiet environment
Background distractions make it harder to catch details. Use good headphones to hear every word clearly in your audio recordings.
✅ Always double-check accuracy
Even professional transcription services aren’t perfect. Spot-check timestamps and quotes to make sure your transcript reflects what was actually said.
✅ Create a consistent style guide
Decide early how you’ll handle pauses, filler words, overlaps, and non-verbal cues like laughter or long silences. Write these rules down and apply them consistently.
✅ Highlight key parts relevant to research questions
As you go, mark the sections that connect directly to your research questions or coding scheme. This makes the later stages of working with your qualitative data much easier.
Challenges
While transcription is a vital step in qualitative research, students often run into difficulties:
❌ Ethical issues
Confidentiality and consent are critical. Make sure to anonymize personal data and follow your university’s ethical guidelines when working with transcription files.
❌ Long interviews
A single 60-minute audio recording can take several hours to transcribe manually. Always factor this into your research timeline.
❌ Background noise
Café recordings or group settings often produce “dirty” audio. Cleaning the file with speech recognition software helps, but some parts may remain [inaudible].
❌ Accents and dialects
Strong accents or regional dialects can be hard to understand, especially for non-native speakers.
❌ Technical terminology
Subject-specific jargon can slow you down if you’re not familiar with it. Keep a glossary of recurring terms to ensure consistency.
FAQs
Transcribing an interview means converting spoken words from an audio recording or video file into written text. In qualitative research, this step is crucial to analyze data systematically and connect findings to your research questions.
Manually, it usually takes 3–6 hours depending on audio quality and experience. With transcription software or AI-powered transcription, you can reduce this to about 1–2 hours including corrections.
Popular transcription tools like Otter.ai, Notta, or Sonix offer affordable plans, real-time transcripts, and editing features. Always review the transcript carefully to ensure accuracy before using it in academic writing.
- Add timestamps
- Anonymize sensitive data
- Use consistent speaker labels
- Note pauses or inaudible sections
Format transcripts in a clear, readable way: one speaker per paragraph, consistent font, timestamps, and anonymized names. Follow your university’s formatting guidelines and include interview transcriptions in the appendix if required.