
Crop marks are essential printing terms in professional printing. They indicate the final size of a document and show cutting machines exactly where to trim the paper. Without crop marks, especially in full-bleed designs, precise and consistent results are not guaranteed. Understanding how crop marks work is fundamental when preparing a print-ready file.
Crop marks explained briefly
Crop marks are thin corner lines that indicate the final cut size of a printed document. Together with bleed and the safety zone, they ensure accurate trimming and prevent white edges or cut-off content. In commercial printing, they are essential for producing clean, consistent results.
Definition: Crop marks
Crop marks, also known as trim marks, are thin lines printed in the corners of a document. They show the printer exactly where the paper must be cut to reach its final size and therefore define the final dimensions.
They are essential in professional printing, particularly when a design extends to the very edge of the page (full bleed). Crop marks are used in commercial production workflows and apply across different types of printers, especially digital and offset systems.
Online A4 printing for A$0.16
- Quick production times & reputable delivery
- Professional A4 prints for personal and business use
- Configure the printing specifications for your A4-size prints
Learn more!
Trim line
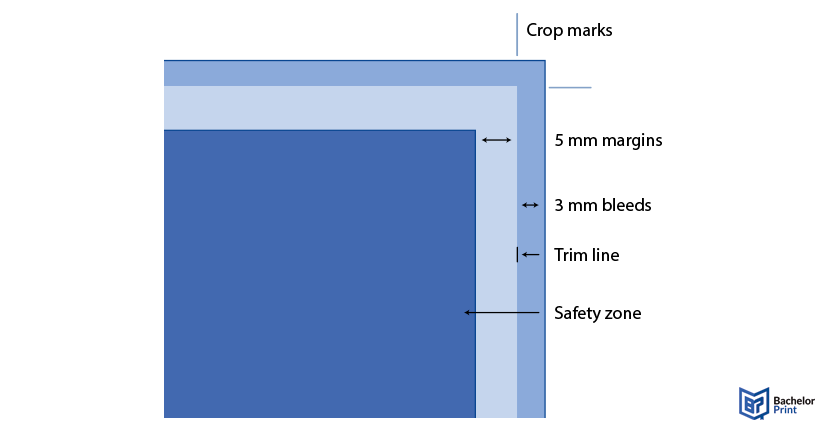
The trim line is the exact point where your printed piece is cut to its final size. It represents the physical edge of the finished product and serves as the central reference point in every print-ready file.
In commercial printing, designs are printed on larger sheets first and then trimmed down using industrial cutting machines. The trim line defines where the blade is intended to drop.
➜ Without a clearly defined trim line, accurate cutting and consistent results across large print runs would not be possible.
Bleed
The bleed is your outer insurance area. It extends beyond the trim line and ensures that your design still reaches the edge of the page after cutting.
Even industrial cutting machines have small tolerances. When a stack of 1,000 flyers is trimmed, the blade can shift by a fraction of a millimeter. Without bleed, this slight movement could create thin white slivers.
Standard bleed sizes
- United States: 0.125 in (3.175 mm)
- European Union: typically 2–3 mm (0.08–0.12 in)
➜ You print slightly more than you need, so that cutting inaccuracies never affect the visible result.
Safety zone
The safety zone is the inner insurance area of your layout. It sits inside the trim line and protects important content from being cut off during trimming.
Just as a cutting blade can shift outward, it can also shift slightly inward. If text, logos, or page numbers are placed too close to the edge, even a minimal inward movement could trim part of that content.
Standard safety distance
- Usually 0.125 in (3.175 mm) inside the trim line
- Can vary depending on print provider specifications
If you imagine the trim line as the blade’s target, the safety zone is the buffer that keeps your essential content away from the danger area. Staying within this zone ensures your final product looks intentional and professionally aligned, even if the cut is slightly off-center.
How they work together
Think of these three elements as a target system for the cutting blade:
- The bleed (the overshoot):You print slightly more than you need.
- The trim line (the target):You define exactly where the cut should happen.
- The safety zone (the buffer):You keep important content away from the cutting area.
When a file is sent to a commercial printer, it is printed on a sheet larger than the final format. The crop marks sit outside the design area and act like crosshairs, indicating precisely where the trim line runs.
If you examine a print file from the outside in, the structure looks like this:
- Outer limit (bleed edge):The point where your background image or colour ends.
- Trim line (the goal):The intended cutting path. The crop marks point directly to this line.
- Inner limit (safety zone):The invisible boundary your essential content should not cross.
Cutting tolerances in industrial print
In a perfect world, the blade hits the trim line perfectly. In the real world, industrial guillotines have a cutting tolerance (usually ± 0.5 mm to 1.5 mm).
- If the blade shifts OUT: The bleed ensures it still hits ink, not white paper.
- If the blade shifts IN: The safety zone ensures it hits empty background, not your logo.
By using all three, you guarantee that even if the machine is slightly “off,” the final product looks like it was cut with 100% precision.
Commercial printing
Crop marks are primarily used in commercial printing, where precision, speed, and consistency are critical.
Why they are necessary
-
PDF requirements:
Professional print files are typically delivered as PDF/X. These standards include defined bleed settings and proper mark placement. Incorrect exports can lead to production issues. -
Multiple-up printing:
Business cards, postcards, or flyers are often printed several times on one large sheet. Crop marks indicate exactly where each individual piece must be separated. -
High-speed cutting accuracy:
Automated cutting systems rely on clear trim indicators to process large stacks precisely and efficiently. -
Size consistency across print runs:
Precise trimming prevents uneven edges and ensures that every copy matches the intended dimensions.
How to add in software
To add crop marks in various design software, follow these brief steps:
Canva adds crop marks automatically when you download your file as a specific type.
- Click the Sharebutton in the top right corner.
- Select Download.
- Under File type, choose PDF Print.
- Check the box for Crop marks and bleed.
- Click Downloadto generate the file with marks.
In these programs, crop marks are typically added during the Export or Save process rather than directly on the workspace.
- Go to File ➜ Export(InDesign) or File ➜ Save As (Illustrator).
- Select Adobe PDF (Print)as the format.
- In the dialogue box, click on the Marks and Bleeds
- Check the box for Crop Marks(InDesign) or Trim Marks (Illustrator).
- Ensure Use Document Bleed Settingsis checked if you have a bleed area set.
Photoshop does not have a “one-click” crop mark button for the canvas; they must be added manually or through print settings.
- Manual method: Increase your Canvas Size(Image ➜ Canvas Size) to include extra space for marks (e.g., add 1 inch).
- Use the Line Tool (U)or Pencil Tool (1 pixel width) to draw small lines at the corners where the trim should occur.
- Print method: Go to File ➜ Print, scroll to Printing Marks, and check Crop Marks to see them on the printed output or PDF.
In Publisher, crop marks are part of the advanced print and output settings.
- Go to File ➜ Print.
- Select a paper size largerthan your actual design size (to allow room for the marks).
- Click on Advanced Output Settings.
- On the Marks and Bleedstab, check the Crop marks box and click OK.
Note: There is no native crop marks feature for design in MS Word. It only offers crop marks as a text boundary setting which is not for printing.
Common mistakes
Even when crop marks are added correctly, small setup errors can still cause visible problems after trimming.
❌ Without bleed, even a minimal cutting shift can result in thin white edges.
❌ Important content should never sit directly on the edge; it belongs inside the safety zone.
❌ Activating crop marks alone is not enough. The bleed must also be included in the PDF export.
❌ Margins protect layout structure; bleed extends beyond the trim line. They serve different purposes.
PDF printing at BachelorPrint from A$0.16
- Upload your files & order printed PDFs in minutes
- Secure online PDF printing service with reliable delivery
- High-quality prints from any PDF, including reports & more
Learn more!
Best practices
Following a few technical standards will prevent most production issues.
✅ Maintain consistent internal margins to protect essential content.
✅ Set bleed when creating the document, not at the end of the workflow.
✅ Use a high-quality preset, ideally PDF/X if required by your print provider.
✅ Always check your printer’s required bleed size, PDF settings, and file standards.
FAQs
A crop mark is a thin line placed at the corners of a print-ready file. It indicates where the paper should be cut to reach the final document size.
Crop marks are small, thin lines positioned outside the trim line. They do not touch the design itself and sit in the outer white area of the file.
“No crop marks” means the file does not include trimming indicators. In commercial printing, this can make precise cutting more difficult unless the printer adds them manually.
- Crop marks indicate where the cut should happen.
- Bleed refers to the extra design area that extends beyond that.
