The book spine is the structural core of bookbinding, keeping pages opening smoothly and firmly secured. It balances flexibility with strength, ensuring durability through countless reads. Whether you’re crafting a bespoke art book or printing academic texts, a well-designed spine elevates quality. Discover how precise spine calculations and design can transform your next printing project.
Book spine explained briefly
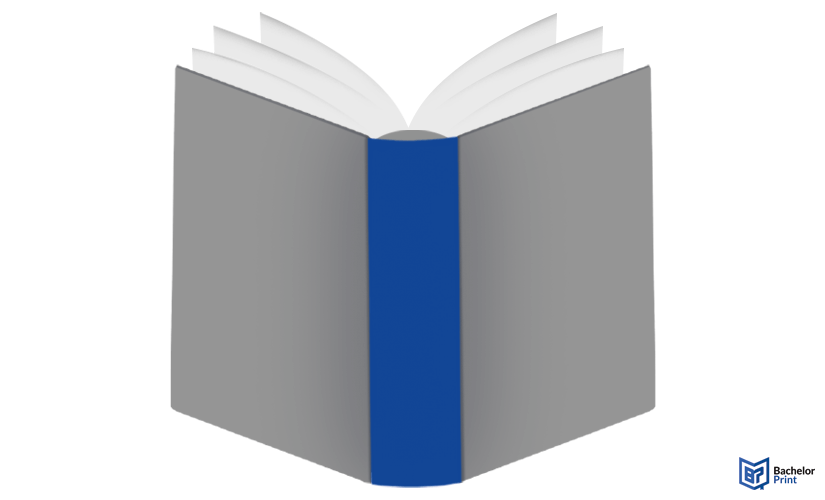
The book spine is the vertical edge of a bound book that holds the pages together and connects the front and back covers. It provides structural stability, allows the book to open and close smoothly, and often carries title and author information.
Definition: Book spine
The book spine is the vertical edge of a bound book that holds the pages together and connects the front and back covers. As the structural core of bookbinding, it ensures stability, keeps pages aligned, and allows the book to open and close smoothly.
Historically, spines evolved from simple sewn bindings on medieval manuscripts to today’s variety of techniques, including perfect binding for softcovers and case binding for hardcovers.
Special attention is needed when designing and producing spines for hardcover books, high‑page‑count paperbacks, and lay‑flat bindings, as these require precise calculations and durable materials to maintain both function and appearance.

Hardcover with individual embossing
- Price calculator & 3D live preview
- Professional binding for thesis, dissertation, or books
- Print on demand with fast delivery right to your doorstep
Learn more!
Anatomy
A book spine isn’t just a strip of material. It’s a carefully built structure combining internal and external elements to provide durability, flexibility, and visual appeal.
Inner structure
These elements form the core of the spine and directly affect how a book holds together and functions:
- Glue: Adhesive layers, often hot-melt or PUR, that secure the pages to the spine in perfect-bound and case-bound books.
- Signatures: Groups of pages folded and stacked before being bound, providing stability and helping the book open evenly.
- Gauze (mull): Fabric applied over the spine to reinforce the joint between the book block and cover, adding durability and flexibility.
- Sewing stations: Points where thread passes through signatured in sewn bindings, adding strength and longevity, often used in high-quality books.
Outer elements
The visible components of the spine that protect and enhance its appearance:
- Protective coatings: The laminations or varnishes applied to the wrap to resist wear, moisture, and fading.
- Printed cover wrap: The outer printed material (paper or cloth) that covers the spine and extends to the front and back covers.
- Headband & tailband: Decorative and reinforcing bands at the top and bottom of the spine, typically seen in hardcover books
Terminology at a glance
Common terms you may encounter include:
Hinge
The flexible area between the spine and covers that allows smooth opening.
Backing
Shaping the spine of a hardcover book to create a rounded form.
Shoulder
The edge created when the text block is backed, helping covers fit snugly.
Rounding
Curving the spine for strength and aesthetic appeal in case bound books.
Jacket spine
The spine section of a removable dust jacket, often carrying the title and author.
Common types & binding methods
The type of binding you choose determines not only how the spine looks but also how the book feels, opens, and endures over time. From cost-effective options for manuals to premium solutions for archival editions, understanding the most common binding types helps you select the right one for your project.
One of the most popular methods for paperbacks, perfect binding, uses strong adhesive to attach pages to the spine.
✅ Relatively affordable
✅ Suitable for short to medium print runs
❌ Doesn’t open fully flat
❌ Less durable than sewn bindings
Designed for a premium reading experience, these bindings allow the book to open completely flat without damaging the spine.
✅ Unique, high‑end aesthetic
✅ Excellent for double‑page spreads
❌ Typically higher cost
❌ More complex production
Often used in hardcover production, Smyth‑sewn books are sewn together before being encased in a rigid cover, making them extremely durable.
✅ Exceptional strength
✅ Pages open more smoothly
❌ Longer turnaround
❌ Higher production cost
Other popular types
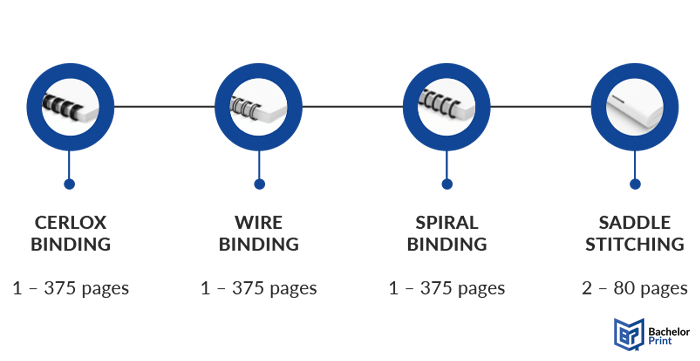
Cerlox/Comb binding
Uses a plastic spine with teeth to hold pages
➜ Commonly for documents and training material
Wire binding
Durable metal loops allow books to open flat
➜ Popular for calendars, notebooks, and workbooks
Spiral binding
Similar to wire binding but with a plastic coil
➜ Flexible and cost effective for notebooks or reports
Saddle stitching
Staples are placed through the fold of sheets
➜ Ideal for slim booklets and brochures

Repair & maintenance
A damaged book spine can affect both the usability and longevity of a book, but with the right tools and techniques, many issues can be fixed or even prevented. Whether it’s for personal keepsakes or heavily used business materials, proper care makes all the difference.
How to repair a damaged book spine
Common issues include:
- Loose pages
- Cracked glue
- Detached covers
Depending on the binding type, simple repairs can be done at home or by a professional.
For softcovers
Reapply bookbinding glue to reattach loose pages or a detached spine. Use clamps to hold the book in place while drying.
For hardcovers
Use book cloth or repair tape to reinforce or reattach the spine. If the spine liner is broken or severely damaged, the book may require full rebinding for lasting stability.
For sewn bindings
Replace damaged threads with fresh stitching if the signatures are still intact. For antique or archival books, conservation specialists are recommended.
How to maintain a book spine
Preventing damage is easier than fixing it. With proper handling and storage, book spines can last for decades.
- Dust regularly
- Avoid forcing books open flat
- Store upright and avoid leaning stacks
- Use bookends on partially filled shelves
- Keep away from moisture and direct sunlight
Note: Proper maintenance preserves appearance and ensures long-term readability.
Design
A book spine is more than a functional element. It’s a key part of the book’s overall design and often the first thing people see on a shelf. A well-designed spine communicates professionalism, brand identity, and even the book’s content at a glance.
Key design elements
Typography
Choose fonts that are readable at small sizes and reflect the book’s style. Vertical or horizontal orientation depends on regional reading habits and shelf standards.
Balance & spacing
Avoid crowding because the spine text should have breathing room to remain legible, even on narrow books.
Color blocking & imagery
Bold colors or simple patterns help the spine stand out. Imagery can be used sparingly to support the theme without overwhelming the text.
Dos & don’ts
✅ Dos
- Keep typography simple and clean
- Leave space to prevent cut‑off text
- Align design with book theme or brand
- Use high-contrast text for maximum legibility
❌ Don’ts
- Forgot to account for printing tolerances
- Don’t ignore the front‑back spine connection
- Use overly intricate fonts that reduce readability
- Overcrowd the spine with too much text or imagery
Where to place text
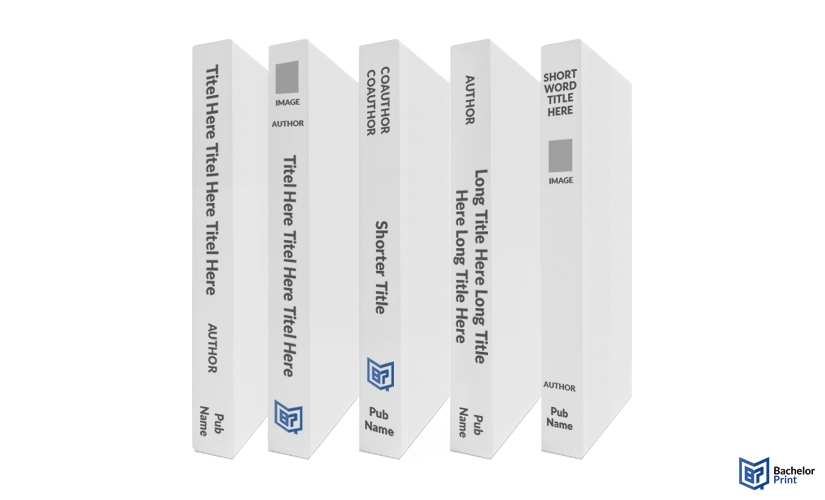
Text placement is critical for both readability and aesthetics. Aligning titles, authors, and publisher logos correctly ensures the spine looks balanced and professional.
See the illustration below for examples of good practices in spine text placement:

Tips for positioning spine text:
- Titles are typically centred along the spine for balance.
- Use vertical text for long titles rather than awkward hyphenation.
- Prioritize elements, title first, followed by author, then publisher logo.
- Leave enough clearance at the top and bottom to avoid cut‑off during trimming.
Legibility, branding & accessibility
A well‑designed spine should be easy to read, reflect the book’s or company’s identity, and remain accessible to all readers. In retail or library settings, spines compete for attention. So prioritize high‑contrast text, clean layouts, and adequate spacing to ensure titles and authors are instantly recognizable.
For business publications, integrate brand elements like logos, corporate fonts, and consistent color schemes to create a professional, cohesive look across multiple volumes.
Finally, consider accessibility: use sufficiently large fonts, avoid overly decorative typefaces, and ensure strong contrast between text and background to support visually impaired readers.
Calculating the spine width
The spine width depends on four main factors:
- Page count
- Binding types
- Paper thickness (caliper)
- Tolerance for bleed/wrap-around
Calculating spine width accurately is essential; too narrow and the text may be cut off, too wide and the spine will look loose. To get it right, follow these steps.
- Determine the total number of sheets, not pages.
- Find the paper thickness, often expressed in calipers.
- Consider the binding type, as some add extra thickness.
With these values, you can use the following formula:
Formula
c = p × t
- c = spine width
- p = page count
- t = paper thickness
To see it in practice, here’s a quick example:
Quick reference table
Here’s a quick reference table for estimating spine width based on common paper weights. The values assume an average paper thickness of 0.08–0.10 mm per page, which is typical for 80 gsm and 100 gsm paper.
Page count
80 gsm (≈0.08 mm/page)
100 gsm (≈0.10 mm/page)
100 pages
8 mm (≈0.31″)
10 mm (≈0.39″)
200 pages
16 mm (≈0.63″)
20 mm (≈0.79″)
300 pages
24 mm (≈0.94″)
30 mm (≈1.18″)
Note: Always add a small tolerance (≈0.02″ / 0.5 mm) for bleed and cover wrap to prevent text cut‑off.
Preparing files for spine production
Getting your spine design print‑ready requires careful setup. Proper preparation ensures your text and design align correctly and that nothing is cut off during trimming or binding.
1️⃣ Setting up your document
Work in professional layout software like Adobe InDesign or Illustrator, using your printer’s exact dimensions for cover width, height, and calculated spine width. Always include the spine as part of a single spread (front + back + spine).
2️⃣ Adding bleed, safety zones & alignment guides
- Bleed: Add at least 3 mm (0.125″) bleed on all edges so design elements extend beyond trim lines.
- Spine guides: Use guides to center text and ensure even spacing between the front, spine, and back.
- Safety zones: Keep essential text (title, author) at least 2–3 mm (0.08–0.125″) away from trim edges.
3️⃣ Checking for overprints, trapping & registration marks
Before exporting, verify that no critical elements are accidentally set to overprint (which could make them disappear) and ensure correct trapping (color overlap for consistent edges). Add registration marks if required by your type of printer.
Checklist
Before sending files to print:
- Embed or outline all fonts.
- Convert colors to CMYK for print.
- Confirm correct dimensions and spine width.
- Ensure images are high‑resolution (300 DPI minimum).
- Export as a print‑ready PDF/X‑1a or PDF/X‑4 (check your printer’s specs).
Copy and print from AU$0.16
- High-quality copies & prints for any project
- Vibrant color prints or sharp black & white prints
- Online copy and print services delivered straight to your door
Learn more!
Best practices
A well‑produced spine enhances both durability and visual appeal. These best practices help ensure professional results:
Add design impact with foil stamping (metallic highlights), embossing or debossing (raised or recessed effects), or spot UV (high‑gloss accents). These techniques make the spine stand out on crowded shelves.
Opt for recycled or FSC‑certified paper to reduce environmental impact. For budget efficiency, compare short‑run digital printing (ideal for small batches) vs. bulk offset printing (cost‑effective for large volumes).
Select paper weights that balance flexibility with strength. Combine them with the right finish: matte for a subtle, modern look, gloss for vibrancy, or soft‑touch lamination for a premium tactile feel.
Note: Always request a printed proof before large‑scale production to check spine alignment, text clarity, and color consistency.
Common pitfalls
Even small errors in spine preparation can lead to big problems. Avoid these common mistakes:
An incorrect spine width can result in cut‑off text or a slack spine where pages shift and loosen. Always double‑check your calculations and add a small tolerance for wrap and bleed.
Choosing a binding type or paper stock that’s too weak for a large page count can cause warping, cracking, or spine collapse over time. Select bindings that match your book’s size and intended use.
Note: Consult your printer when you’re in doubt. They can verify your spine width and recommend adjustments based on the binding type and paper stock.
FAQs
It’s the vertical edge that binds the pages together, connecting the front and back covers.
Typically, the title, author’s name, and sometimes a publisher’s logo or design element.
The fore‑edge. This is the outer edge of the pages opposite the spine.
It depends on the paper thickness, but for standard 80 gsm paper, it’s approximately 16 mm (≈0.63 in).
It refers to opening a book so wide that the spine’s binding cracks, often causing visible creases or damage.