
In the world of printing terms, the word airbrush might sound more like an art class than a print shop, but it’s more relevant than you think. This technique plays a key role in design and visual prep. Whether used for adding depth to images or creating smooth color transitions, airbrushing enhances visual appeal, making it a valuable tool in both commercial and artistic print applications. Let’s take a closer look.
Airbrush explained briefly
An airbrush is a handheld tool that sprays paint or ink in a fine mist to produce smooth gradients and detailed shading. In printing contexts, airbrushed artwork can be digitized and printed, merging artistic effects with reproducible output.
Definition: Airbrush
An airbrush is a small, air-powered tool that sprays paint, ink, or dye in a fine mist. It uses compressed air to atomize the liquid, allowing for smooth, controlled application. Originally developed for illustration and retouching, airbrushes are now widely used in design, art, cosmetics, and even in preparing visuals for printing.
History
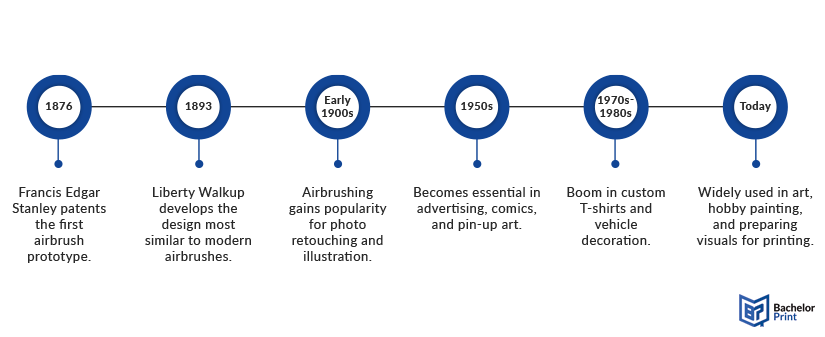
The airbrush has a surprisingly rich history. Its development did not start in a high-tech lab, but in the inventive minds of 19th-century creatives.
The first patented airbrush was developed in 1876 by Francis Edgar Stanley (one of the Stanley Steamer brothers), but it was Liberty Walkup’s 1893 design that more closely resembles the airbrush we know today.
Originally used for photo retouching and fine illustrations, the tool quickly became a favourite in advertising, comic book coloring, and even cake decorating. By the mid-20th century, it had made its way into industrial design and eventually into the world of printing, where its ability to create smooth tonal transitions helped shape the look of grayscale and halftone imagery.
From vintage magazine covers to modern product prototypes, the airbrush has quietly but powerfully influenced the way we see and reproduce images.
11×17 printing at BachelorPrint
- Large format print for posters, plans & presentations
- Fast turnaround & reliable delivery right to your door
- Brilliant color quality & details on premium paper from £0.13
Learn more!
How it works
At first glance, an airbrush might look like a fancy pen, but inside, it’s all physics and precision engineering. Here’s a simple step-by-step guide to how it works:
Step 1: Air pressure & the venturi effect
Compressed air flows through the airbrush body, speeding up as it passes a narrow point called the venturi. This creates a low-pressure zone that sucks paint or ink from the reservoir.
Step 2: Atomization
As the fluid enters the fast-moving airstream, it breaks into tiny droplets. This process is called atomization. The finer the droplets, the smoother and more consistent the spray.
Step 3: Trigger controls
Most airbrushes use a trigger mechanism:
- Single-action: One button controls airflow, and paint flow is set manually.
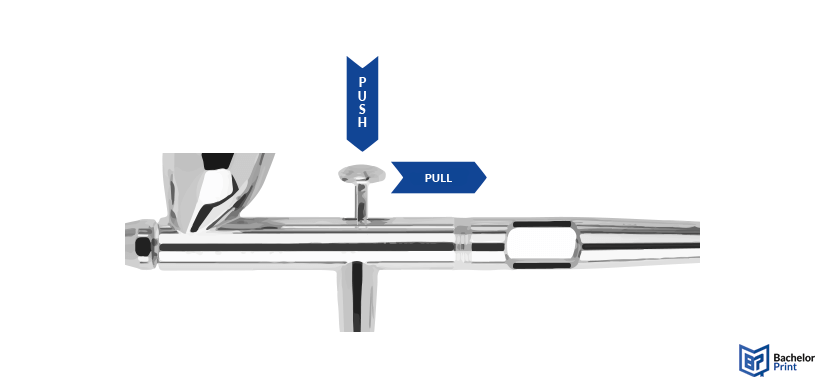
- Double-action: Pushing the trigger down starts the air, while pulling it back gradually releases paint.
Step 4: Spraying
The atomized paint exits the nozzle in a controlled mist. By adjusting air pressure, nozzle size, and paint consistency, you can create anything from a fine line to a soft, even gradient, which is perfect for detailed artwork or preparing images for copying.
⇨ In short, an airbrush combines air and liquid with just the right balance of force and finesse,
letting you build up tones layer by layer.
Main components
Before you can master an airbrush, it helps to know what’s under the bonnet and how each spray mode changes the final result.
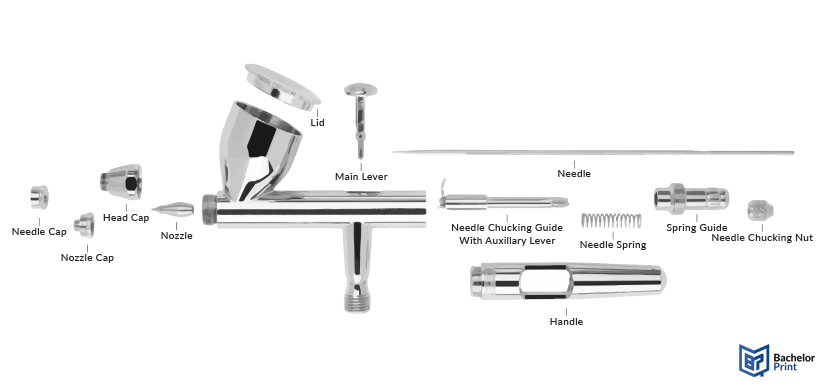
These are the essential parts that work together
Needle cap
Protects the needle tip and shapes the spray pattern; can be removed for more detail but risks needle damage.
Nozzle cap
Covers and secures the nozzle in place, directing airflow to help atomize the paint evenly as it exits the airbrush.
Head cap
Holds the nozzle in place, ensuring a tight seal to prevent leaks and maintain consistent spray.
Nozzle
A precision tip where paint and air mix and exit; the size of the nozzle determines spray width and detail level.
Lid
Covers the fluid cup to prevent spills and contamination while spraying or moving the airbrush.
Main lever
The trigger you press and pull to control both airflow and paint flow, adjusting line thickness and opacity.
Needle chucking guide with auxiliary lever
Connects the main lever to the needle, transferring trigger movement to control paint flow accurately.
Needle spring
Provides tension so the needle returns to the closed position when the trigger is released.
Spring guide
Holds the needle spring in place inside the airbrush body, keeping tension consistent during operation.
Needle chucking nut
Secures the needle to the chucking guide, allowing smooth movement with the trigger and easy needle removal.
Needle
A tapered rod that controls paint flow; pulling it back opens the nozzle for more paint release.
Handle
The part you grip to control the airbrush, providing stability and precision during spraying.
Feed types
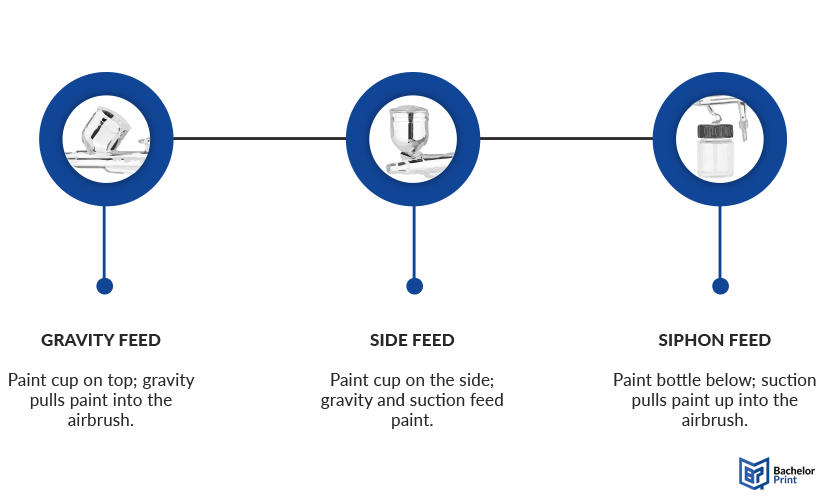
Before choosing an airbrush, it helps to understand how different feed types work and what each one is best suited for:
Gravity feed
Side feed
Siphon feed
The paint cup sits on top, using gravity for finer control and maintaining lower pressure.
The paint cup sits on the side, balancing gravity and suction for flexible use.
The paint reservoir hangs below, with suction pulling paint into the airbrush body.
Mix types
Airbrushes can produce different spray modes depending on their construction and settings:
- Air and paint combine inside the airbrush body, creating a fine, consistent spray.
- Best for: Fine details, smooth gradients, high-precision work.
- Air and paint meet outside the tip, resulting in a rougher, less precise spray.
- Best for: Broader coverage, less delicate work like priming large surfaces.
⇨ Choosing the right combination depends on how much control you need and
the type of surface you’re working with.
Types
Airbrushes come in a few main types, each suited to different levels of control and kinds of projects. Here’s a quick guide to help you understand the options.
In this simpler design, pressing the trigger releases both air and a fixed amount of paint. You set the paint flow manually beforehand, usually with a knob.
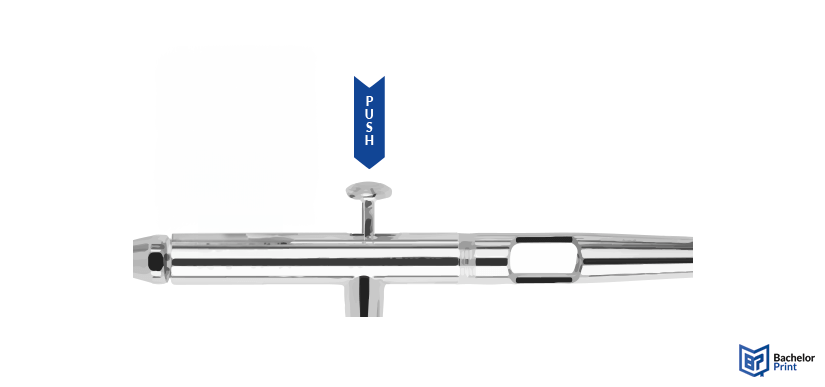
This design gives you much more control. Press the trigger down to start the airflow, then pull it back to gradually increase paint flow. This allows you to adjust line thickness and opacity on the fly.
Tips & techniques
Getting a smooth, professional result with an airbrush takes practice, but the right tips and techniques will speed up the learning curve.
Tips
Here are some practical tips to help you improve your airbrushing:
Thin your paint properly
Always dilute your paint to about the consistency of milk. This prevents clogging and ensures an even, consistent spray.
Adjust your air pressure
For detailed work, set your compressor around 15 –25 psi. Lower pressures help reduce overspray and improve control.
Practice trigger control
Spend time learning how to pull back the trigger smoothly to control paint flow. Consistent movement prevents splatters and blotches.
Test before spraying
Spray onto a piece of scrap material first before working on your project. This helps you fine-tune flow and pressure settings.
Clean frequently
Rinse your airbrush with cleaner between colors and perform a deep clean after each session to avoid paint buildups and clogging.
Work safely
Always use your airbrush in a well-ventilated area or, if that’s not possible, wear a protective mask to prevent inhaling harmful fine paint particles.
Techniques
Here are some common airbrushing techniques and what they’re best for:
Hold the airbrush still and lightly pull back the trigger to create small, precise dots.
Use short, controlled bursts close to the surface to create a speckled, textured effect.
Move your hand steadily while adjusting the trigger pull to create lines of varying thickness.
Start close to the surface and gradually pull back while easing off the trigger to blend color smoothly.
Spray a dark base coat (usually black), then spray lighter tones from above to simulate natural light.
A3 printing for £0.13 at BachelorPrint
- Quickly print your A3 papers online
- Choose from a variety of finishes & extras
- Vibrant A3 poster printing on premium paper
Learn more!
Airbrush in printing
Airbrush techniques have carved out a unique place in printing and product decoration. While many people associate airbrushing with freehand art or miniature painting, it’s also a popular method for creating visuals that are reproduced through various printing processes.
Common uses
Below are some of the most popular ways airbrush is applied in printing:
Application
Description
Airbrush artists spray directly onto fabric to create one-of-a-kind designs and smooth gradients.
Before digital tools, airbrush was used to retouch photos and prepare magazine covers for print.
Designers airbrush models to show how products will look in marketing materials and packaging.
Similarities with printing
Airbrushing and printing share several key qualities:
- Layering: Both techniques build up color and tone gradually to create depth and shading.
- Opacity control: Requires precise management of how transparent or solid the paint or ink appears.
- Preparation for reproduction: Airbrushed originals are often scanned or photographed to create consistent printed copies.
Differences from printing
Despite similarities, there are clear differences:
Real-world examples
Imagine you want to create a custom design on a T-shirt:
Here, you use the airbrush to manually spray the artwork onto the fabric, carefully blending light and dark areas to create a seamless, smooth gradient that transitions naturally from one tone to the next, ensuring a professional and polished finish.
The design is carefully scanned at a high print resolution, ensuring that every gradient, subtle shading, and intricate detail is captured with precision to preserve the artwork’s integrity for digital reproduction.
Once digitized, the high-resolution digital file is transferred and printed onto various garments, posters, or other products using a sublimation printer, effectively combining the creative nuances of airbrush art with the consistency and efficiency of modern printing techniques.
Note: If you plan to reproduce airbrush art in print, always work on a clean, high-contrast surface and scan at a high DPI to preserve detail.
Right setup for printing projects
If you want your airbrushed artwork to look professional in print, the right setup is essential. Here’s what you need to consider:
⇨ Use a gravity feed airbrush.
The cup sits on top, allowing the paint to flow easily with less air pressure, making it ideal for creating smooth gradients and fine, detailed work.
⇨ Choose a 0.3–0.4 mm nozzle.
This size balances detail and coverage, letting you spray clean lines and subtle shading without clogging too easily.
⇨ Use a quiet compressor with an air regulator and moisture trap.
Clean, consistent air prevents splattering and keeps your gradients smooth.
- Work in a well-ventilated area.
- Use a spray booth or extractor fan if possible.
- Keep your surface clean and dust-free to avoid imperfections.
- Flush with cleaner between color changes.
- Occasionally, treat moving parts with airbrush-safe lubricant.
- Clean your airbrush after each session to prevent dried paint buildup.
FAQs
An airbrush is a small, air-powered tool designed to spray paint, ink, or dye in a fine mist, allowing for smooth, controlled application and the creation of intricate details and tonal effects.
It’s used for:
- Cosmetics
- Illustration
- Model painting
- custom clothing
- Preparing artwork for printing
Airbrushing takes practice and patience, but with the right equipment and proper technique, most beginners will see significant improvement in their results fairly quickly.
Some airbrush kits use canned propellant as a convenient option, but a compressor is highly recommended for consistent airflow, more precise control, and overall better results in your work.
You’ll need:
- An airbrush
- A compressor
- Suitable paint
- Thinner or cleaner
- Protective gear (gloves, mask)